A detailed practical guide to resizing images for assignments, classroom presentations, online portals, school communication, beginner web projects, and quick edits without software
You finish typing your assignment, check your spelling, and feel ready to submit it. Then you add an image, and suddenly the page looks wrong. A chart becomes too wide. A screenshot pushes a paragraph onto the next page. A photo covers half the slide. A PDF grows larger than expected. What looked like a finished project now feels messy because one image does not fit the space properly. This happens to students all the time, and it also happens to teachers preparing classroom material and everyday users trying to upload files online.
This is exactly where an Image Resizer becomes useful. Instead of dragging image corners inside Word or PowerPoint and hoping the result looks fine, users can resize the image correctly before placing it into the file. That small step helps documents stay clean, presentations stay balanced, and uploads work more smoothly. It also removes a very common kind of frustration. Many people do not have design training, and many do not want to open large editing programs just to make one image smaller. They only need a quick, simple way to make the image fit the job.
The value of a simple resizing tool becomes even clearer in education. Students use images in reports, presentations, project files, forms, and portal submissions. Teachers use them in worksheets, classroom slides, notices, and learning materials. Beginner developers use them in portfolio projects and practice websites. Parents and everyday users need them for school forms, event notices, or profile photos. These are all real situations, not special cases. The problem is common, and the solution should be easy.
When an image is resized properly, the whole piece of work improves. The page looks more organized. The slide becomes easier to read. The upload becomes faster. The file feels more manageable. That is why image resizing is not just a tiny editing task. It is part of preparing better digital work, especially when time is short and the user wants results without extra hassle.
What Is an Image Resizer?
An Image Resizer is a tool that changes the dimensions of an image so that it fits a specific purpose better. A user can usually adjust width and height directly or make the image smaller by percentage. This is helpful because most images are not ready for use the moment they are downloaded, scanned, photographed, or copied from another source. A mobile photo can be much larger than needed for a school form. A screenshot can be too wide for a report. A diagram may be clear but impossible to place neatly inside a slide without adjustment.
Resizing is different from cropping. Cropping removes part of the image. Resizing keeps the entire image but changes how large or small it appears. That difference matters a lot in educational work. A student using a science diagram or a labeled map usually needs every part of the image to stay visible. Cropping might remove labels, arrows, or important details. Resizing helps the user preserve the full image while making it more practical for the available space.
This also matters because people often try to solve image size problems in the wrong place. Instead of resizing the image before use, they insert it into a document and then struggle to adjust it there. Sometimes that works, but often it creates stretched visuals, inconsistent sizes, uneven page flow, or overly large files. A better workflow is to prepare the image first. Once the image already matches the intended use, the final document or presentation becomes much easier to manage.
An Image Resizer gives control back to the user. It turns a frustrating guess-and-check process into a simple step. Whether the user is resizing one picture for a portal or ten diagrams for a school project, the goal stays the same: make the image fit naturally, clearly, and without unnecessary effort.
Why Students, Teachers, and Everyday Users Need an Image Resizer
Students work with visuals more often than they think. They use screenshots in computer assignments, diagrams in science reports, maps in geography work, photos on title pages, and charts in presentations. Each of these images may come from a different place. One might be from a phone camera, another from a website, and another from a teacher’s shared file. Because of that, image sizes are rarely consistent. Without resizing, students can end up with documents that look uneven even when the actual content is strong.
Teachers face the same issue from the preparation side. They create worksheets, slide decks, handouts, revision packs, digital classroom tasks, and parent notices. Images help explain ideas, but badly sized images can damage the layout and reduce clarity. If one worksheet picture is too big and another is too small, the page feels disorganized. If a slide has an oversized visual, the explanation may get squeezed into a corner. Teachers usually do not want to spend extra time fixing this by hand for every file. They want a quick way to make classroom visuals fit correctly.
Everyday users also run into these problems in ordinary tasks. A student may need to upload a profile image to a portal. A parent may need a child’s photo for school registration. A volunteer may need to send an event poster to a school group. A beginner developer may want page images to look neat in a class project. These tasks do not require advanced photo editing skills. They require a simple practical tool that works quickly.
That is why an online Image Resizer is so helpful. It saves time, reduces stress, and improves the quality of the final result. More importantly, it works for users who simply need to get something done. It supports school work, teaching material, online submissions, and basic digital projects without making the user deal with complicated software.
Use Case 1: Resizing Images for School Assignments and Project Submissions
Situation: A student is creating a project in Word, PowerPoint, or PDF format and needs to insert images such as diagrams, screenshots, charts, or reference visuals. This happens in nearly every subject. A biology report might need cell diagrams. A history project might include old building photos. A computer assignment may require screenshots of code or program output. These visuals help explain the topic, but they often arrive in sizes that do not fit the page well.
Problem: The images are too large or uneven. Once inserted, they break the structure of the assignment. Text gets pushed down, headings lose their spacing, and the file may start looking messy. In presentations, one oversized image can take over the whole slide. Students often try fixing the issue by dragging image corners inside the document editor, but that creates inconsistent sizes and sometimes makes images look stretched. On top of that, too many large images can make the final file heavier than expected, which becomes a problem during submission.
Solution using the Image Resizer: Before adding the visual to the assignment, the student uploads it to the Image Resizer and adjusts width, height, or percentage. This creates a version that already fits the intended space. A student preparing a science report can make all diagrams the same width. A student building a presentation can resize screenshots so the explanation still has room beside them. Instead of forcing the document to adapt to the image, the student makes the image adapt to the document.
Result and impact: The final project looks cleaner, more organized, and more professional. Teachers can focus on the ideas instead of being distracted by awkward formatting. Students feel more confident because the file looks polished rather than rushed. A simple resize can turn a cluttered assignment into one that feels carefully prepared from the first page to the last.
Use Case 2: Preparing Classroom Images for Worksheets and Presentations
Situation: A teacher is designing worksheets, classroom slides, revision handouts, or activity sheets. These materials often include pictures, symbols, diagrams, object photos, and examples collected from different sources. In many classes, especially for younger students, visuals are important because they help students understand faster and stay engaged.
Problem: The visuals do not match in size. One worksheet image may be much larger than the others. One presentation slide may have a huge picture while the next has a tiny one. This makes the lesson material look inconsistent and harder to follow. It also slows down preparation. A teacher may waste time trying to align and resize each image manually inside a slide deck or document instead of focusing on the lesson itself.
Solution using the Image Resizer: The teacher resizes images before adding them to the worksheet or presentation. This makes it easy to keep a consistent visual style. For example, all vocabulary pictures can be resized to a similar width. All math diagrams can be adjusted so they are large enough for students to see clearly but still leave space for instructions. A teacher making a worksheet on animals, weather, shapes, or community helpers can quickly prepare a full set of images that fit neatly on the page.
Result and impact: The lesson material becomes cleaner and easier to understand. Students see a more organized page or slide, which supports attention and comprehension. Teachers also save time because they are working with ready-to-use visuals instead of fixing the same sizing problem again and again. Better-sized images improve the look of classroom content and help keep the teaching message clear.
Use Case 3: Resizing Photos for Online Forms, Portals, and Student Profiles
Situation: A student or parent needs to upload a photo for admission, registration, a student portal, a scholarship form, an exam account, or a profile page. Usually the available photo comes from a phone or camera, and it is much larger than the portal actually needs.
Problem: The system may reject the upload, or the photo may appear awkward after submission. Users often assume the website is the problem when the real issue is simply the image size. This becomes stressful when deadlines are close. Some people try to shrink the image too much and end up with a blurry or poor-quality result. Others keep retrying the same oversized file and waste time.
Solution using the Image Resizer: The user uploads the photo into the tool and adjusts it to a more practical dimension. This can be done quickly by setting width and height or reducing the image by percentage. A parent filling out a school form can prepare a child’s image in minutes. A student creating an exam profile can do the same without installing anything on the computer or phone.
Result and impact: The photo becomes easier to upload and more suitable for the form. The user avoids avoidable errors and completes the submission more smoothly. In school-related systems, small technical problems can become stressful very quickly, so a simple resizing tool removes one common obstacle and makes the overall process more manageable.
Use Case 4: Optimizing Images for School Events, Notices, and Communication
Situation: Schools and teachers regularly share event posters, exam reminders, class notices, holiday announcements, competition details, and meeting information through messaging groups, email, and school portals. Most of these updates work better when they include a visual, because people notice posters and announcement graphics more quickly than plain text.
Problem: Large posters do not always work well when shared digitally. A design that looks fine on a computer may feel too large or awkward on a phone screen. A parent using mobile data may struggle to load it quickly. A teacher sharing class information in a group may find that oversized visuals take longer to send and view. Even when the design is good, poor size choices can reduce the effectiveness of the communication.
Solution using the Image Resizer: Staff or teachers can resize the poster or notice before sharing it. A sports day banner can be adjusted for mobile viewing. A timetable reminder can be made smaller so it loads faster in messaging groups. A class notice with uniform instructions, timing, or homework reminders can be resized so it is clear without being unnecessarily heavy.
Result and impact: School communication becomes easier to open, easier to view, and easier to share. Families and students get the message faster, especially on mobile devices. The content stays the same, but the delivery improves because the image size now matches the way people actually receive it. That is a practical improvement schools can benefit from every day.
Use Case 5: Resizing Images for Beginner Web or App Development Projects
Situation: A beginner developer is building a simple website, class portfolio, app interface, or coding assignment. The project may use screenshots, banners, icons, gallery photos, or product-style images. These visuals help the project feel complete, but they are often added without preparation.
Problem: The images are too large, mismatched, or awkward for the design. A banner may push the page too far down. One project screenshot may be much taller than the others. A card layout may break because images do not fit evenly. Beginners sometimes focus on HTML, CSS, or JavaScript and forget that image size also affects design and even page loading. As a result, the project works, but it does not feel polished.
Solution using the Image Resizer: The user prepares the visuals before adding them to the project. Portfolio screenshots can be resized to similar widths. Banner images can be reduced so they fit the section better. Sample images used in cards or galleries can be made more consistent. This gives the project a cleaner visual structure without needing advanced design software.
Result and impact: The website or app looks more balanced and may feel faster too. This matters during class presentations or portfolio reviews because the work appears more thoughtful. It also teaches an important beginner lesson: good digital projects are not only about code. They are also about preparing media that supports the layout properly.
Use Case 6: Quick Image Adjustments Without Software
Situation: A user needs to change the size of an image quickly but does not have Photoshop or any other editing software. This is extremely common. A student may be using a school computer. A teacher may be working from a laptop without design tools installed. A parent may only have a phone. The task itself is simple, but traditional editing software can feel too heavy for such a basic need.
Problem: Without a simple tool, the user may waste time searching for software, trying random apps, or giving up on the task. Installing programs just to resize one image is not practical. It may also be impossible on shared devices, school systems, or restricted computers. For many users, especially beginners, the software becomes a bigger obstacle than the original image problem.
Solution using the Image Resizer: The user simply uploads the image, enters the desired width, height, or percentage, and downloads the resized version instantly. There is no installation, no long setup, and no complicated interface to learn. A student can resize a project image in a browser before inserting it into PowerPoint. A teacher can fix a worksheet visual between classes. A parent can resize a registration photo directly from a mobile device.
Result and impact: The task gets done quickly, even by users with little technical experience. This makes the tool especially useful for everyday school and office situations where speed matters. It is beginner-friendly, works on mobile and desktop, and removes the feeling that simple editing requires advanced software. That convenience alone makes it valuable for many users.
Step-by-Step Guide to Using the Image Resizer
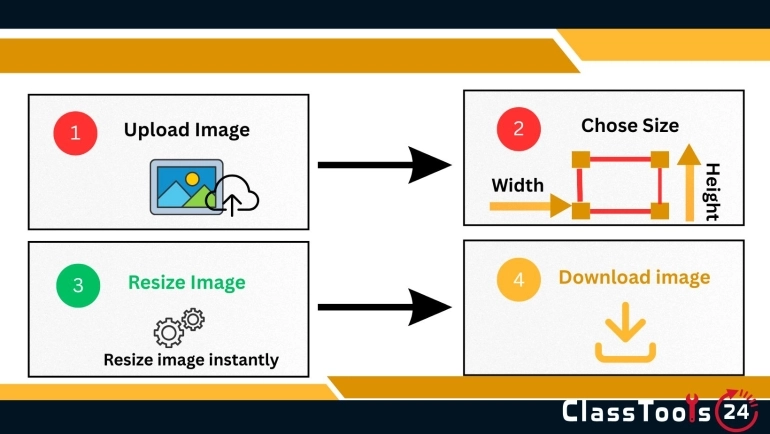
The first step is to decide where the image will be used. Is it going into a Word assignment, a PowerPoint slide, a worksheet, a portal, or a small web project? This matters because the right size depends on the final destination. Once the purpose is clear, the user can resize more accurately instead of guessing.
Next, upload the image into the tool. After that, choose how you want to resize it. If you know the exact dimensions needed, set the width and height directly. If the image simply needs to become smaller overall, percentage resizing is often faster. This is especially useful for screenshots, project images, or large photos from a phone.
Then preview the result. Check whether labels, text, arrows, faces, or important details are still clear. This is very important in educational images such as science diagrams, charts, or screenshots with readable information. Once the image looks right, download the resized version and place it into the final file or upload it to the required platform.
A good habit is to resize all needed images before building the final project. Students can prepare all visuals before starting the report. Teachers can prepare a consistent set of images before designing a lesson. This saves time later because the main file stays easier to manage from the beginning.
Benefits of Using an Online Image Resizer
One major benefit is speed. Users can solve an annoying image problem in a few moments instead of opening large software or struggling inside a document editor. This matters when assignments are due, classes are about to begin, or portal deadlines are close. Quick tools help real people in real time.
Another benefit is simplicity. The tool is beginner-friendly, so students, teachers, parents, and everyday users can use it without training. There is no need to learn complicated editing features when the goal is simply to make the image fit correctly. That makes the whole process less stressful.
Resizing also improves presentation quality. Assignments look cleaner, slides look more balanced, worksheets feel more organized, and web projects appear more polished. Better-sized visuals support readability and design at the same time. In school work, that can improve how the overall file is received even when the actual content stays the same.
There is also the benefit of easier uploads and sharing. Smaller or better-sized images often work more smoothly on portals, messaging apps, emails, and slower internet connections. This is especially useful in school communication and online submission tasks where a heavy file can create unnecessary delay.
Common Mistakes People Make When Resizing Images
One common mistake is choosing random dimensions without thinking about where the image will be used. Another is stretching the image by changing width and height in a way that damages its natural shape. This can make photos look strange and diagrams harder to understand.
Users also often make the image too small. This solves the size problem but creates a readability problem. A chart may fit better, but its labels become impossible to read. A screenshot may look neat on the page but lose the information it was supposed to show. Educational work especially needs clarity, not just small size.
Another mistake is ignoring platform requirements or device needs. A portal may not need the original high-resolution image. A notice shared in a parent group may need to be lighter for easy mobile viewing. Users also forget to keep the original file safe. It is better to resize a copy when possible so the original image remains available for future use.
Helpful Tips for Better Image Resizing Results
Start with the final use in mind. Ask what job the image needs to do. If it is for a worksheet, clarity matters. If it is for a portal, suitability matters. If it is for a beginner website, both fit and consistency matter. The clearer the purpose, the easier the resize decision becomes.
Try to keep similar images at similar sizes in the same project. Three charts in one report should not all feel completely different. Vocabulary images on one worksheet should not jump from tiny to huge. Consistency makes documents and slides feel more professional without requiring extra design skills.
Preview the result before final use. Check text, labels, and important parts carefully. Resize copies instead of originals when possible. If you are not sure about the best dimensions, make smaller adjustments first instead of one huge change. Small careful choices usually lead to better results than rushed fixes.
Most importantly, treat resizing as preparation, not as a last-minute rescue step. When users prepare images early, the rest of the project becomes easier to format and share. That one habit can save a surprising amount of time.
Conclusion
An Image Resizer helps solve real problems that appear in school assignments, classroom presentations, online forms, portal submissions, school notices, and beginner development projects. Students use it to stop oversized images from ruining their layout. Teachers use it to create clearer worksheets and better slide decks. Everyday users rely on it for forms and quick image fixes. Beginners use it to make projects look cleaner without depending on heavy software.
The tool is useful because it is practical. It does not ask users to become designers. It simply helps them make images fit the task in front of them. That leads to cleaner formatting, faster uploads, smoother sharing, and more professional-looking work. For school, teaching, daily internet tasks, and quick edits without software, an easy Image Resizer can make a small but very noticeable difference.
Frequently Asked Questions
Why do students need to resize images for assignments?
Students often upload screenshots, diagrams, project photos, and presentation visuals to school platforms like Google Classroom or email systems. Large images can slow uploads, exceed file size limits, or make documents difficult to manage. Resizing images helps students submit assignments faster and keep files more organized.
Can teachers use an image resizer for classroom presentations?
Yes. Teachers frequently resize images before adding them to classroom slides, worksheets, digital lessons, and smartboard presentations. Properly sized visuals help presentations load faster and look more balanced during lessons.
Will resizing images reduce image quality?
Resizing an image correctly usually maintains good visual quality while reducing unnecessary dimensions. For classroom projects, assignments, and presentations, resized images are often easier to manage without noticeable quality loss.
Why are large images a problem for school projects?
Large images can increase document size, slow down presentations, and create upload problems on school systems. Students and teachers working with older computers or slower internet connections may especially benefit from smaller optimized images.
Can I resize screenshots for PowerPoint presentations?
Yes. Students and teachers often resize screenshots, charts, diagrams, and photos before adding them to PowerPoint slides. This helps slides look cleaner and prevents oversized visuals from disrupting layouts.
How does resizing help with online assignment submissions?
Many school platforms have upload limits for assignments and project files. Resizing images helps reduce file size, making uploads faster and reducing the chance of submission errors.
Can resized images be used in PDF reports and school documents?
Absolutely. Resized images are commonly added to reports, research documents, project portfolios, and printable assignments. Smaller and properly sized images also help PDF files remain easier to share and download.
What types of images do students commonly resize?
Students often resize mobile photos, screenshots, scanned homework pages, infographics, charts, diagrams, portfolio images, and presentation graphics for school-related work.
Is an image resizer useful for beginner web development projects?
Yes. Beginner developers often use resized screenshots, banners, gallery images, and icons in coding assignments or portfolio websites. Properly sized visuals help projects look cleaner and more professional.
What other tools work well with an Image Resizer?
Students and teachers often combine an Image Resizer with tools like Image Compressor, JPG to PDF, PNG to JPG, QR Code Generator, and Word to PDF when preparing assignments, classroom resources, and presentations.